GPXPower: The 4 Key Levers – Mass, CdA, Cᵣ and Power
The 4 key levers in the model: mass, CdA, Cᵣ, power
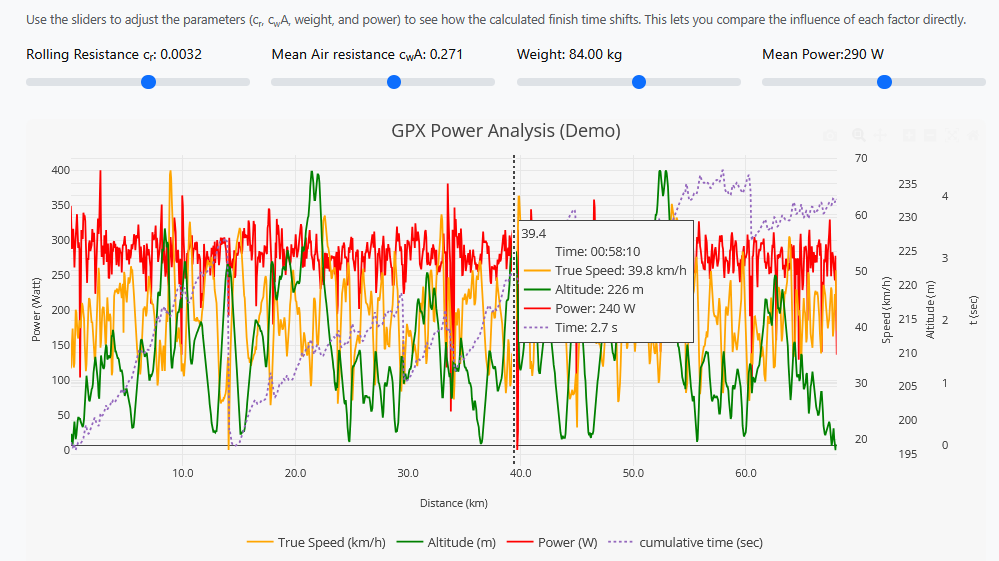
When you work with a simple cycling physics model (e.g. in a GPX analysis), the same four parameters show up again and again. Not because they are the only factors—but because, in practice, they cover most of what feels “fast” or “slow” on the road: aerodynamic drag, rolling resistance, climbing—and your engine.
To help you use these sliders intuitively, here’s a practical breakdown:
- What does the parameter do?
- When does it matter?
- What are typical levers you can pull?
1) Mass (total weight)
What it is in the model: Rider + bike + setup (bottles, tools, etc.). In the end, it’s what actually has to go up the hill.
When it really “matters”
- Uphill: Mass acts directly. The steeper and slower it gets, the more weight becomes the dominant opponent.
- Flat: Mass isn’t irrelevant (rolling resistance), but at higher speeds it’s often overshadowed by aerodynamics.
What you do with it in practice
- For rolling/hilly courses, system weight is a clear lever.
- For flat, fast courses, weight is often not the first lever to pull (unless you’re riding very slowly or the surface is very rough).
2) CdA (aerodynamics)
What it is in the model: Your “aero signature”: position + helmet/suit + cockpit/bottles + anything that sits in the wind.
When it really “matters”
- As soon as it gets fast: On flat terrain, the share of drag increases massively as speed goes up.
- Even on mild climbs: If you’re fast enough, aerodynamics becomes important again—even when you’re technically riding uphill.
What you do with it in practice
- The biggest lever is almost always position: smaller frontal area, steadier posture, tuck head/shoulders.
- Then come setup details: bottle placement, a clean cockpit, removing anything unnecessary from the wind.
Key idea: CdA saves you “expensive watts” exactly where you get the most time per watt: at speed.
3) Cᵣ (rolling resistance)
What it is in the model: Cᵣ is the rolling resistance of your setup—tires, pressure, and surface determine how “freely” the bike rolls.
When it really “matters”
- When aerodynamics doesn’t dominate everything: at moderate speeds or in slower sections.
- When the surface slows you down: rough asphalt, poor road quality, sections with lots of vibration.
What you do with it in practice
- Optimize tires first (model/width), then set pressure to match your weight and the surface.
- “More pressure = faster” is mostly true on very smooth pavement—on rough roads, slightly lower pressure can be the better overall package.
Key idea: Cᵣ is a small number, but it’s a steady, constant loss—over distance, it often adds up.
4) Power
What it is in the model: Your output—the dial you use to “buy” speed.
Why it’s the most important practical parameter
- Watts are your direct output, regardless of whether wind, gradient, or surface is working against you.
- At the same time, the model makes it obvious: how expensive speed is—and that depends on CdA, Cᵣ, and mass.
What you do with it in practice
- On paper, “more watts” is always faster.
- In reality, the key is to spend watts where they deliver the most speed (and not waste them where resistance simply eats them up).
Quick takeaways you can apply immediately
- Want to get faster on flat races? → Start with CdA (position/setup).
- Want to get faster in the mountains? → System weight + steady effort.
- Does everything feel slow despite good watts? → Check Cᵣ (tires/pressure/surface).
- Want consistently strong performance? → Use power as your anchor, so wind/gradient don’t distort your pace.
👉 Try it with the GPXPower demo: GPXPower Demo
These articles might also interest you:
- TrackIQ Proof – Klagenfurt & Frankfurt: faster through smarter power distribution — 17.02.2026
- From TrackIQ pacing to your device: FIT export for Garmin® Edge & ZWO workouts for Zwift®/MyWhoosh® etc. — 14.02.2026
- TrackIQ – Optimal Performance Strategy Through Physics — 25.10.2025
- Master Your Race Day with RaceYourTrack — 24.10.2025